Bevor Du das Widget einrichtest, konfiguriere zuerst das Radio-Dashboard.
Schwebendes Player-Widget am Bildschirmrand
Was macht diese Karte?
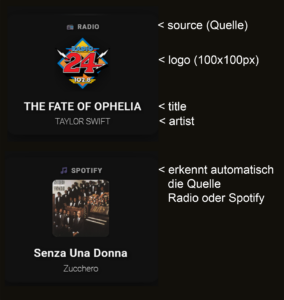
Die Karte erstellt ein schwebendes Mini-Player-Widget, das immer am unteren
rechten Bildschirmrand fixiert ist und folgende Informationen anzeigt:
- Quelle (oben) – „
 Radio“ oder „
 Spotify“
 - Logo (Mitte) – Radio-Logo oder Spotify-Album-Cover
- Titel (unten) – Song-/Sendungs-Titel
- Künstler (ganz unten) – Interpret-Name
Besonderheit: Bei Klick navigiert es zum Radio-Dashboard (/dashboard-haus/radio)
- type: custom:button-card
            entity: media_player.kuche_2
            show_name: false
            show_state: false
            show_icon: false
            tap_action:
              action: navigate
              navigation_path: /dashboard-haus/radio
            styles:
              card:
                - height: 220px
                - background: transparent
                - backdrop-filter: blur(15px)
                - border: 0px solid rgba(255, 255, 255, 0.1)
                - box-shadow: 0 8px 32px rgba(0, 0, 0, 0.5)
                - border-radius: 20px
                - padding: 20px
                - position: fixed !important
                - bottom: 20px !important
                - right: 20px !important
                - z-index: 999 !important
                - width: 280px !important
              custom_fields:
                source:
                  - position: absolute
                  - top: 15px
                  - left: 50%
                  - transform: translateX(-50%)
                  - font-size: 12px
                  - font-weight: 600
                  - color: rgba(255, 255, 255, 0.6)
                  - text-transform: uppercase
                  - letter-spacing: 1px
                  - text-shadow: 1px 1px 4px rgba(0,0,0,0.8)
                logo:
                  - position: absolute
                  - top: 40px
                  - left: 50%
                  - transform: translateX(-50%)
                  - width: 100px
                  - height: 100px
                title:
                  - position: absolute
                  - bottom: 40px
                  - left: 30px
                  - right: 30px
                  - text-align: center
                  - font-size: 20px
                  - font-weight: 500
                  - color: white
                  - letter-spacing: 0.5px
                  - text-shadow: 2px 2px 8px rgba(0,0,0,0.8)
                artist:
                  - position: absolute
                  - bottom: 15px
                  - left: 30px
                  - right: 30px
                  - text-align: center
                  - font-size: 15px
                  - font-weight: 2
                  - color: rgba(255, 255, 255, 0.9)
                  - text-shadow: 2px 2px 8px rgba(0,0,0,0.8)
            custom_fields:
              source: |
                [[[
                  const mediaContentId = entity.attributes.media_content_id || '';
                  const albumName = entity.attributes.media_album_name || '';

                  if (mediaContentId.includes('spotify:')) {
                    return ' Spotify';
                  }

                  if (albumName.includes('Flashback')) {
                    return ' Radio';
                  } else if (albumName.includes('Munot')) {
                    return ' Radio';
                  } else if (albumName.includes('Radio 24')) {
                    return ' Radio';
                  }

                  return ' Radio';
                ]]]
              logo: |
                [[[
                  const albumName = entity.attributes.media_album_name || '';
                  const entityPicture = entity.attributes.entity_picture || '';
                  const mediaContentId = entity.attributes.media_content_id || '';

                  if (mediaContentId.includes('spotify:')) {
                    return `<img src="${entityPicture}" style="width: 100%; height: 100%; object-fit: cover; border-radius: 8px; filter: drop-shadow(0 4px 12px rgba(0,0,0,0.6));">`;
                  }

                  let logoSrc = '/local/radio-logos/flashbackfm.png';

                  if (albumName.includes('Flashback')) {
                    logoSrc = '/local/radio-logos/flashbackfm.png';
                  } else if (albumName.includes('Munot')) {
                    logoSrc = '/local/radio-logos/radiomunot.png';
                  } else if (albumName.includes('Radio 24')) {
                    logoSrc = '/local/radio-logos/radio24.png';
                  }

                  return `<img src="${logoSrc}" style="width: 100%; height: 100%; object-fit: contain; filter: drop-shadow(0 4px 12px rgba(0,0,0,0.6));">`;
                ]]]
              title: |
                [[[
                  return entity.attributes.media_title || 'Kein Titel';
                ]]]
              artist: |
                [[[
                  return entity.attributes.media_artist || '';
                ]]]
Position und Größe der Karte
Im Bereich styles: card: findest du alle Einstellungen:
Karten-Position
- position: fixed !important      # Fixiert am Bildschirm
- bottom: 20px !important         # 20px vom unteren Rand
- right: 20px !important          # 20px vom rechten Rand
- z-index: 999 !important         # Über anderen Elementen
Position ändern:
Linke Seite statt rechts:
- left: 20px !important           # Links statt right
# right: 20px !important entfernen!
Oben statt unten:
- top: 20px !important            # Oben statt bottom
# bottom: 20px !important entfernen!
Zentriert unten:
- bottom: 20px !important
- left: 50% !important
- transform: translateX(-50%) !important
# right: 20px !important entfernen!
Karten-Größe
- height: 220px                   # Höhe der Karte
- width: 280px !important         # Breite der Karte
Größere Karte:
- height: 260px                   # Höher
- width: 320px !important         # Breiter
Kleinere Karte:
- height: 180px                   # Kleiner
- width: 240px !important         # Schmaler
Bei Größenänderungen müssen die Element-Positionen angepasst werden!
Karten-Design
Hintergrund und Effekte
- background: transparent         # Transparenter Hintergrund
- backdrop-filter: blur(15px)     # Blur-Effekt dahinter
- border: 0px solid rgba(255, 255, 255, 0.1)  # Rahmen
- box-shadow: 0 8px 32px rgba(0, 0, 0, 0.5)   # Schatten
- border-radius: 20px             # Abgerundete Ecken
- padding: 20px                   # Innenabstand
Dunklerer Hintergrund (weniger transparent):
- background: 'rgba(0, 0, 0, 0.5)'  # Halbtransparentes Schwarz
- backdrop-filter: blur(10px)
Heller Hintergrund:
- background: 'rgba(255, 255, 255, 0.2)' # Halbtransparentes Weiß
Rahmen hinzufügen:
- border: 2px solid rgba(255, 255, 255, 0.3) # Weißer Rahmen
Mehr Blur:
- backdrop-filter: blur(25px) # Stärkerer Blur
Stärkerer Schatten:
- box-shadow: 0 12px 40px rgba(0, 0, 0, 0.8)
Eckigkeit:
- border-radius: 10px             # Weniger rund
- border-radius: 0px              # Eckig
Quelle (Source) anpassen
Im Bereich custom_fields: source: unter styles:
Position
source:
  - position: absolute
  - top: 15px                     # Abstand von oben
  - left: 50%                     # Horizontal zentriert
  - transform: translateX(-50%)   # Zentrierung
Nach links verschieben:
  - left: 30px                    # Links ausrichten
  # transform: translateX(-50%) entfernen!
Nach rechts verschieben:
  - right: 30px                   # Rechts ausrichten
  # left und transform entfernen!
Schrift-Design
  - font-size: 12px               # Schriftgröße
  - font-weight: 600              # Dicke (100-900)
  - color: rgba(255, 255, 255, 0.6)  # Farbe mit Transparenz
  - text-transform: uppercase     # Großbuchstaben
  - letter-spacing: 1px           # Buchstaben-Abstand
  - text-shadow: 1px 1px 4px rgba(0,0,0,0.8)  # Schatten
Größere, fettere Schrift:
  - font-size: 14px
  - font-weight: 700
Andere Farbe:
  - color: rgb(0, 161, 136)       # Türkis
  - color: rgba(255, 165, 0, 0.9) # Orange
Kein Uppercase:
- text-transform: none # Normal statt UPPERCASE
Quelle-Text ändern
Im Bereich custom_fields: source: | (mit den eckigen Klammern):
if (mediaContentId.includes('spotify:')) {
  return ' Spotify';            // ← Spotify-Text ändern
}

if (albumName.includes('Flashback')) {
  return ' Radio';              // ← Radio-Text ändern
}

return ' Radio';                // ← Standard-Text
Eigene Texte:
if (mediaContentId.includes('spotify:')) {
return ' Musik läuft';
}
return '
Musik läuft';
}
return ' Live Radio';
Logo/Cover anpassen
Im Bereich custom_fields: logo: unter styles:
Position und Größe
logo:
  - position: absolute
  - top: 40px                     # Abstand von oben
  - left: 50%                     # Horizontal zentriert
  - transform: translateX(-50%)
  - width: 100px                  # Breite
  - height: 100px                 # Höhe
Größeres Logo:
  - top: 35px                     # Etwas höher (mehr Platz)
  - width: 120px
  - height: 120px
Kleineres Logo:
  - top: 45px
  - width: 80px
  - height: 80px
Logo nach links:
  - left: 30px
  # transform: translateX(-50%) entfernen!
Logo-Pfade ändern
Im Bereich custom_fields: logo: |:
let logoSrc = '/local/radio-logos/flashbackfm.png';  // Standard

if (albumName.includes('Flashback')) {
  logoSrc = '/local/radio-logos/flashbackfm.png';    // ← Pfad ändern
} else if (albumName.includes('Munot')) {
  logoSrc = '/local/radio-logos/radiomunot.png';     // ← Pfad ändern
} else if (albumName.includes('Radio 24')) {
  logoSrc = '/local/radio-logos/radio24.png';        // ← Pfad ändern
}
Neuen Sender hinzufügen:
} else if (albumName.includes('SRF 3')) {
  logoSrc = '/local/radio-logos/srf3.png';
}
Andere Logos verwenden:
logoSrc = '/local/meine-logos/mein-radio.png';
Logo-Style ändern
Im return Statement:
return `<img src="${logoSrc}" style="
  width: 100%;
  height: 100%;
  object-fit: contain;              // contain = komplettes Logo sichtbar
  filter: drop-shadow(0 4px 12px rgba(0,0,0,0.6));
">`;
Logo als Cover (zuschneiden):
object-fit: cover; // Füllt Bereich aus
Runde Logos:
border-radius: 50%; // Kreis
Stärkerer Schatten:
filter: drop-shadow(0 6px 20px rgba(0,0,0,0.9));
Titel anpassen
Im Bereich custom_fields: title: unter styles:
Position
title:
  - position: absolute
  - bottom: 40px                  # Abstand von unten
  - left: 30px                    # Abstand von links
  - right: 30px                   # Abstand von rechts
  - text-align: center            # Zentriert
Weiter unten:
- bottom: 30px # Näher am Artist
Links ausrichten:
  - text-align: left
  - left: 20px
  - right: 60px                   # Mehr Platz rechts
Schrift-Design
  - font-size: 20px               # Größe
  - font-weight: 500              # Dicke
  - color: white                  # Farbe
  - letter-spacing: 0.5px         # Buchstaben-Abstand
  - text-shadow: 2px 2px 8px rgba(0,0,0,0.8)  # Schatten
Größerer Titel:
  - font-size: 24px
  - font-weight: 600
Andere Farbe:
- color: rgb(0, 161, 136) # Türkis
Stärkerer Schatten:
- text-shadow: 3px 3px 12px rgba(0,0,0,1)
Titel-Text ändern
Im Bereich custom_fields: title: |:
return entity.attributes.media_title || 'Kein Titel'; // ← Text wenn leer
Anderer Platzhalter:
return entity.attributes.media_title || '---';
return entity.attributes.media_title || 'Warte...';
Titel kürzen (max 30 Zeichen):
const title = entity.attributes.media_title || 'Kein Titel';
return title.length > 30 ? title.substring(0, 30) + '...' : title;
Künstler anpassen
Im Bereich custom_fields: artist: unter styles:
Position
artist:
  - position: absolute
  - bottom: 15px                  # Abstand von unten
  - left: 30px
  - right: 30px
  - text-align: center
Weiter oben (näher am Titel):
- bottom: 20px
Schrift-Design
  - font-size: 15px
  - font-weight: 2                # Sehr dünn (sollte 200-300 sein)
  - color: rgba(255, 255, 255, 0.9)
  - text-shadow: 2px 2px 8px rgba(0,0,0,0.8)
Dünnere Schrift (korrigiert):
- font-weight: 300 # Dünn
Kleinere Schrift:
- font-size: 13px
Transparenter:
- color: rgba(255, 255, 255, 0.7) # Mehr Transparenz
Künstler-Text ändern
Im Bereich custom_fields: artist: |:
return entity.attributes.media_artist || ''; // ← Leer wenn kein Artist
Platzhalter statt leer:
return entity.attributes.media_artist || 'Unbekannt';
Navigation ändern
Im Bereich tap_action::
tap_action:
  action: navigate
  navigation_path: /dashboard-haus/radio  # ← Dashboard-Pfad
Zu anderem Dashboard navigieren:
navigation_path: /dashboard-haus/musik
Keine Navigation (nur Widget anzeigen):
tap_action:
  action: none
Toggle Player:
tap_action:
  action: call-service
  service: media_player.media_play_pause
  service_data:
    entity_id: media_player.kuche_2
Entity ändern
Ganz oben:
entity: media_player.kuche_2 # ← Dein Media Player